

[ad_1]
A whole end-to-end instance of serving an ML mannequin for picture classification process

This submit will stroll you thru a technique of serving your deep studying Torch mannequin with the TorchServe framework.
There are fairly a little bit of articles about this matter. Nevertheless, usually they’re centered both on deploying TorchServe itself or on writing customized handlers and getting the top outcomes. That was a motivation for me to put in writing this submit. It covers each elements and offers end-to-end instance.
The picture classification problem was taken for example. On the finish of the day it is possible for you to to deploy TorchServe server, serve a mannequin, ship any random image of a garments and at last get the expected label of a garments class. I consider that is what folks might anticipate from an ML mannequin served as API endpoint for classification.
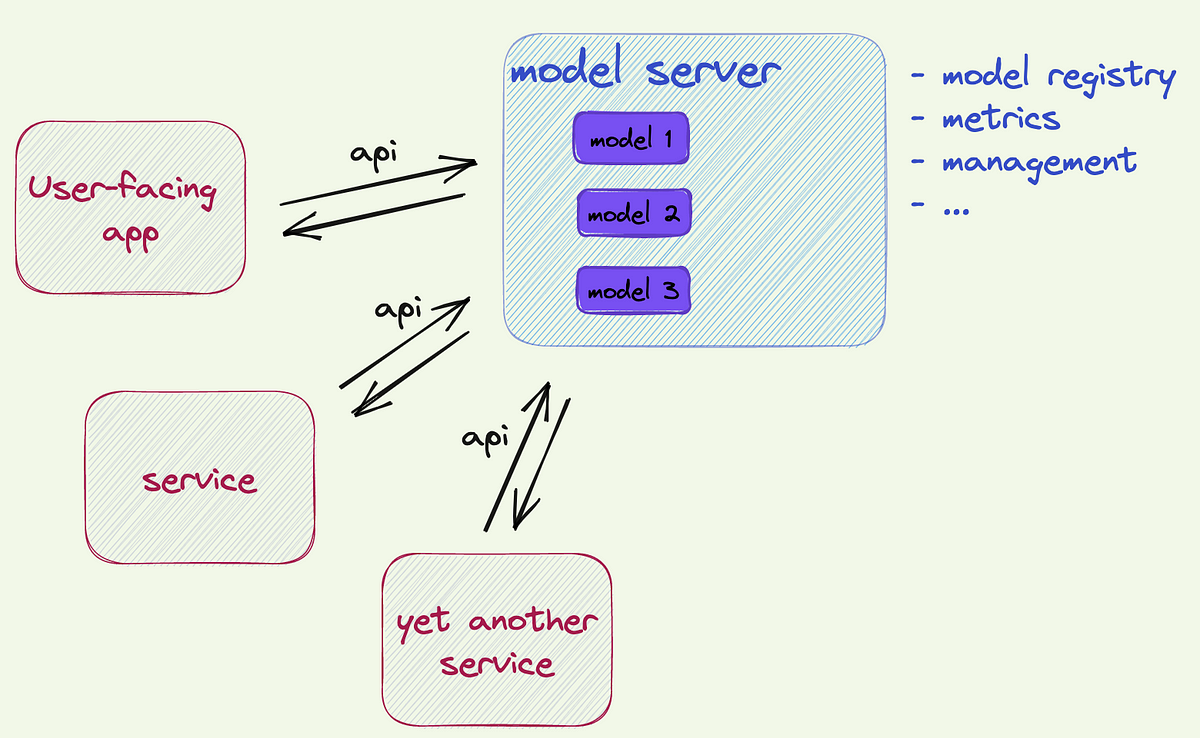
Say, your information science staff designed a beautiful DL mannequin. It’s an important accomplishment with no doubts. Nevertheless, to make a worth out of it the mannequin must be one way or the other uncovered to the surface world (if it’s not a Kaggle competitors). That is referred to as mannequin serving. On this submit I’ll not contact serving patterns for batch operations in addition to streaming patterns purely primarily based on streaming frameworks. I’ll deal with one choice of serving a mannequin as API (by no means thoughts if this API known as by a streaming framework or by any customized service). Extra exactly, this feature is the TorchServe framework.
So, whenever you resolve to serve your mannequin as API you’ve no less than the next choices:
- net frameworks resembling Flask, Django, FastAPI and so forth
- cloud providers like AWS Sagemaker endpoints
- devoted serving frameworks like Tensorflow Serving, Nvidia Triton and TorchServe
All have its professionals and cons and the selection may be not all the time simple. Let’s virtually discover the TorchServe choice.
The primary half will briefly describe how a mannequin was skilled. It’s not vital for the TorchServe nonetheless I consider it helps to comply with the end-to-end course of. Then a customized handler will likely be defined.
The second half will deal with deployment of the TorchServe framework.
Supply code for this submit is situated right here: git repo
For this toy instance I chosen the picture classification process primarily based on FashionMNIST dataset. In case you’re not acquainted with the dataset it’s 70k of grayscale 28×28 pictures of various garments. There are 10 lessons of the garments. So, a DL classification mannequin will return 10 logit values. For the sake of simplicity a mannequin is predicated on the TinyVGG structure (in case you wish to visualize it with CNN explainer): merely few convolution and max pooling layers with RELU activation. The pocket book model_creation_notebook within the repo exhibits all the method of coaching and saving the mannequin.
In short the pocket book simply downloads the information, defines the mannequin structure, trains the mannequin and saves state dict with torch save. There are two artifacts related to TorchServe: a category with definition of the mannequin structure and the saved mannequin (.pth file).
Two modules have to be ready: mannequin file and customized handler.
Mannequin file
As per documentation “A mannequin file ought to include the mannequin structure. This file is obligatory in case of keen mode fashions.
This file ought to include a single class that inherits from torch.nn.Module.”
So, let’s simply copy the category definition from the mannequin coaching pocket book and put it aside as mannequin.py (any identify you favor):
Handler
TorchServe affords some default handlers (e.g. image_classifier) however I doubt it may be used as is for actual circumstances. So, almost certainly you’ll need to create a customized handler to your process. The handler really defines easy methods to preprocess information from http request, easy methods to feed it into the mannequin, easy methods to postprocess the mannequin’s output and what to return as the ultimate outcome within the response.
There are two choices — module degree entry level and sophistication degree entry level. See the official documentation here.
I’ll implement the category degree choice. It principally implies that I have to create a customized Python class and outline two obligatory features: initialize and deal with.
To start with, to make it simpler let’s inherit from the BaseHandler class. The initialize operate defines easy methods to load the mannequin. Since we don’t have any particular necessities right here let’s simply use the definition from the tremendous class.
The deal with operate principally defines easy methods to course of the information. Within the easiest case the move is: preprocess >> inference >> postprocess. In actual purposes doubtless you’ll have to outline your customized preprocess and postprocess features. For the inference operate for this instance I’ll use the default definition within the tremendous class:
Preprocess operate
Say, you constructed an app for picture classification. The app sends the request to TorchServe with a picture as payload. It’s most likely unlikely that the picture all the time complies with the picture format used for mannequin coaching. Additionally you’d most likely practice your mannequin on batches of samples and tensor dimensions should be adjusted. So, let’s make a easy preprocess operate: resize picture to the required form, make it grayscale, rework to Torch tensor and make it as one-sample batch.
Postprocess operate
A multiclass classification mannequin will return a listing of logit or softmax possibilities. However in actual state of affairs you’d fairly want a predicted class or a predicted class with the likelihood worth or perhaps high N predicted labels. In fact, you are able to do it someplace in the primary app/different service but it surely means you bind the logic of your app with the ML coaching course of. So, let’s return the expected class straight within the response.
(for the sake of simplicity the record of labels is hardcoded right here. In github model the handler reads is from config)
Okay, the mannequin file and the handler are prepared. Now let’s deploy TorchServe server. Code above assumes that you’ve got already put in pytorch. One other prerequisite is JDK 11 put in (notice, simply JRE shouldn’t be sufficient, you want JDK).
For TorchServe that you must set up two packages: torchserve and torch-model-archiver.
After profitable set up step one is to arrange a .mar file — archive with the mannequin artifacts. CLI interface of torch-model-archiver is aimed to do it. Sort in terminal:
torch-model-archiver --model-name fashion_mnist --version 1.0 --model-file path/mannequin.py --serialized-file path/fashion_mnist_model.pth --handler path/handler.py
Arguments are the next:
–mannequin identify: a reputation you wish to give to the mannequin
–model: semantic model for versioning
–mannequin file: file with class definition of the mannequin structure
–serialized file: .pth file from torch.save()
–handler: Python module with handler
Consequently the .mar file referred to as as mannequin identify (on this instance fashion_mnist.mar) will likely be generated within the listing the place CLI command is executed. So, higher to cd to your challenge listing earlier than calling the command.
Subsequent step lastly is to start out the server. Sort in terminal:
torchserve --start --model-store path --models fmnist=/path/fashion_mnist.mar
Arguments:
–mannequin retailer: listing the place the mar recordsdata are situated
–fashions: identify(s) of the mannequin(s) and path to the corresponding mar file.
Observe, that mannequin identify in archiver defines how your .mar file will likely be named. The mannequin identify in torchserve defines the API endpoint identify to invoke the mannequin. So, these names could be the identical or completely different, it’s as much as you.
After these two command the server shall be up and working. By default TorchServe makes use of three ports: 8080, 8081 and 8082 for inference, administration and metrics correspondingly. Go to your browser/curl/Postman and ship a request to
http://localhost:8080/ping
If TorchServe works appropriately you must see {‘standing’: ‘Wholesome’}

A few hints for potential points:
1. If after torchserve -start command you see errors within the log with mentioning “..no module named captum” then set up it manually. I encountered this error with the torchserve 0.7.1
2. It could occur that some port is already busy with one other course of. Then doubtless you will notice ‘Partially wholesome’ standing and a few errors in log.
To examine which course of makes use of the port on Mac sort (for instance for 8081):
sudo lsof -i :8081
One choice could be to kill the method to free the port. But it surely may be not all the time a good suggestion if the method is one way or the other vital.
As a substitute it’s potential to specify any new port for TorchServe in a easy config file. Say, you’ve some utility which is already engaged on 8081 port. Let’s change the default port for TorchServe administration API by creating torch_config file with only one line:
management_address=https://0.0.0.0:8443
(you possibly can select any free port)
Subsequent we have to let TorchServe know concerning the config. First, cease the unhealthy server by
torchserve --stop
Then restart it as
torchserve --start --model-store path --models fmnist=/path/fashion_mnist.mar --ts-config path/torch_config
At this step it’s assumed the server is up and working appropriately. Let’s cross a random garments picture to the inference API and get the expected label.
The endpoint for inference is
http://localhost:8080/predictions/model_name
On this instance it’s http://localhost:8080/predictions/fmnist
Let’s curl it and cross a picture as
curl -X POST http://localhost:8080/predictions/fmnist -T /path_to_image/image_file
for instance with the pattern picture from the repo:
curl -X POST http://localhost:8080/predictions/fmnist -T tshirt4.jpg
(X flag is to specify the tactic /POST/, -T flag is to switch a file)
Within the response we should always see the expected label:

Effectively, by following alongside this weblog submit we had been in a position to create a REST API endpoint to which we are able to ship a picture and get the expected label of the picture. By repeating the identical process on a server as an alternative of native machine one can leverage it to create an endpoint for user-facing app, for different providers or as an illustration endpoint for streaming ML utility (see this fascinating paper for a purpose why you doubtless shouldn’t try this: https://sites.bu.edu/casp/files/2022/05/Horchidan22Evaluating.pdf)
Keep tuned, within the subsequent half I’ll develop the instance: let’s make a mock of Flask app for enterprise logic and invoke an ML mannequin served by way of TorchServe (and deploy every thing with Kubernetes).
A easy use case: user-facing app with tons of enterprise logic and with many alternative options. Say, one characteristic is importing a picture to use a desired type to it with a method switch ML mannequin. The ML mannequin could be served with TorchServe and thus the ML half will likely be utterly decoupled from enterprise logic and different options in the primary app.
[ad_2]
Source link
