


[ad_1]
Earlier than we dive into the small print, let’s make clear who this information is for. In case you’re centered on a undertaking with quite a few saved charts, you’ve examined a few metrics, otherwise you’ve been working iteratively on an algorithm — nicely, we’ve got the useful resource for you.
This text will present you the way to:
- Setup and deploy MLflow on the Google Cloud Platform
- Introduce recent, easy strategies for monitoring ML experiments
- Cease storing 100s of charts, recordsdata, and metrics domestically
- Assist your teammates optimize workflows
- Take your teamwork to the subsequent stage
Why MLflow?
However why give attention to MLflow? As a result of the open-source platform is helpful throughout your complete machine learning lifecycle, with 4 parts you should utilize for experimentation, reproducibility, deployment, or as a central mannequin registry.
AI/ML conferences worldwide are additionally giving it extra focus. And it’s one of many tasks of Databricks: a widely known firm based by the creators of Apache Spark™. Given its foundations, the answer is rising quickly. And this information will make your life infinitely simpler, whether or not you’re working alone or as a part of a workforce.
Briefly, MLflow is particularly designed for:
- Optimizing machine studying experiments; and,
- Testing and storing the event course of historical past.
You might even name it a ‘Git repository for ML fashions’ — with all metrics and timelines saved in a single place, alongside an interactive interface (it really shops Git commit ID, used for the execution of a sure run!).
Core Options:
- Observe ML fashions, metrics, and parameters (and evaluate them with ease)
- Retailer fashions and see versioning in a single place
- Allows integration with different Google Cloud parts
Now to what you’ll really study. This detailed information walks you thru the way to arrange MLflow on the Google Cloud Platform (GCP), protecting every little thing from the stipulations to getting began — proper via to the way to log in to MLflow itself.
And in case you’re questioning, “however why hassle utilizing the cloud as a substitute of a neighborhood server?”. It’s a good query, and right here’s our response:
- GCP handles safety and authentication layers for you, so that you don’t want to fret about them;
- You’ll be able to simply increase your resolution (storage, computing energy, and many others.) in case your workforce grows, so that you’re not restricted by your present machine.
Sufficient of the preamble, let’s get into MLflow.
Sources
You’ll want the next assets to arrange an MLflow occasion:
- Cloud SQL Database
- Cloud Storage: artifacts storage (charts, pickles, metrics, and many others.)
- Secret Supervisor: acquiring secrets and techniques at runtime
- Container Registry: for Docker picture storage
- Cloud Run: managed serverless runtime atmosphere
Conditions
GitHub Repository
To finish this tutorial, you’ll want some further code, however we’ve acquired you coated. Now we have a template that wants just some brushes earlier than deployment to GCP.
Observe this link and clone the repository from GitHub to your native machine. In case you’re not acquainted with GitHub, here’s a step-by-step guide on the way to clone a repository (we’ll clarify the remainder of the steps in a while).
GCP CLI
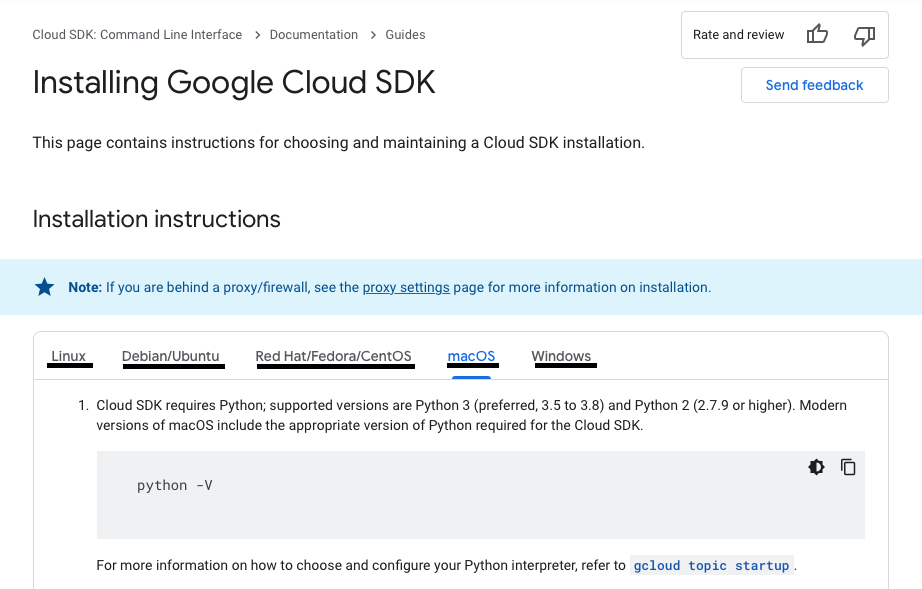
To push Docker photos to the Google Container Registry (GCR), you want the Google Cloud SDK: Command Line Interface (CLI). You’ll be able to see the full set up course of by clicking here.
If it’s good to arrange the SDK, comply with these directions and set up required parts.
Notice: you’ll be able to change tabs (named Working Techniques) to get the configuration you want in your atmosphere.
You must now have every little thing it’s good to full this tutorial.
So, let’s soar in!
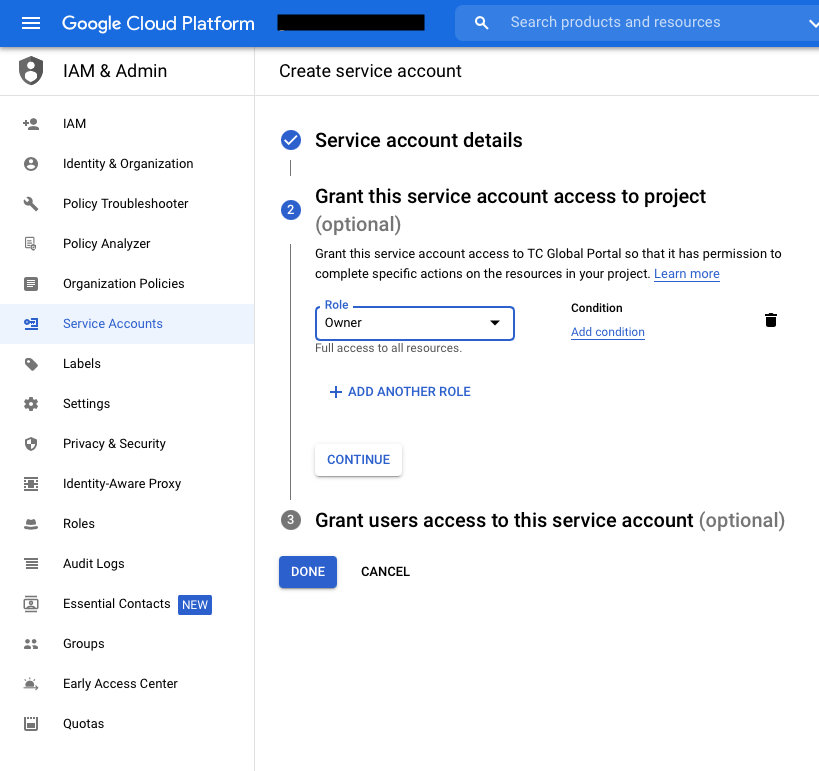
Making a Service Account
Subsequent up, it’s good to create a Google Cloud Service Account. Yow will discover the whole setup course of by clicking here — or you’ll be able to comply with these steps:
- Go to the ‘Service Accounts’ web page
- Select the related undertaking (if required)

- Click on ‘Create Service Account’
- Set the identify of the account

- Set your position (you’ll be able to select “Proprietor” for now, however keep in mind to get acquainted with the permissions scheme on GCP, then you’ll be able to modify them to your wants).
- Non-obligatory: add further customers who would possibly must entry the account.
- Non-obligatory: add further customers who would possibly must entry the account.
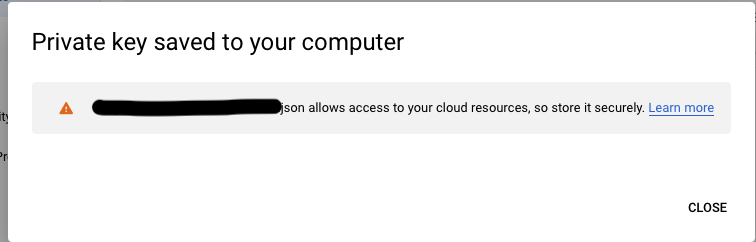
- Generate Key-pair for the Service Account:
- Click on ‘Create Key’ -> Select format {JSON (really useful) or P12} -> Key ought to obtain to your gadget

- Click on ‘Create Key’ -> Select format {JSON (really useful) or P12} -> Key ought to obtain to your gadget
- Necessary: you’ll be able to solely obtain a single key-pair as soon as, so preserve it secure
- Take into account storing it in your google-cloud-sdk listing to maintain every little thing in a single place;
- One service account can retailer as much as 10 key-pairs.
- Now activate your Google Cloud Service Account — run:


`gcloud auth activate-service-account –key-file=<your_credentials_file_path>`
Notice: <your_credentials_file_path> is the trail to the JSON or P12 file you’ve simply downloaded.
- You must now be capable of hook up with the Google Cloud Platform and create assets utilizing your gadget
- Copy this credentials.json file to the secrets and techniques listing in your native model of the repository
Creating GCP Sources
SQL Database
Utilizing the GCP, comply with these steps:
- Select ‘Console’
- From the dropdown menu within the left panel, select ‘SQL’
- Within the occasion kind, select ‘Postgres’
- Notice: it may take some time as ‘Compute Engine’ initializes the useful resource
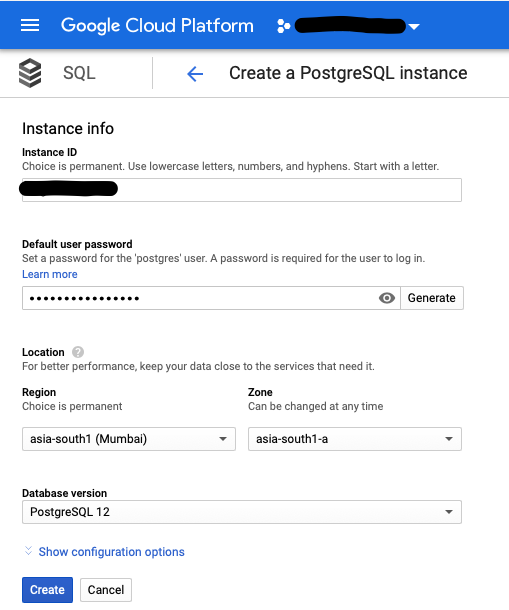
- After a few minutes, a questionnaire (just like the one you see under) ought to seem
- Identify your database, and set the default person password and placement preferences
- Notice: the really useful Postgres model is 12
- Notice: the really useful Postgres model is 12
- On the finish of the shape, you’ll see ‘Present configuration choices’ — use this to specify extra superior setup and flags
- You’ll be able to test if the Public IP field is ready within the Connectivity section
- You may also specify backups, labels, storage kind, storage auto increment, and many others.
- Once you’re completed, click on ‘Create’ and wait till the occasion creates and configures mechanically (at which level you’ll be redirected to the SQL DB Overview pane)
- Notice: this could take a few minutes, after which you’ll obtain a notification of profitable completion.
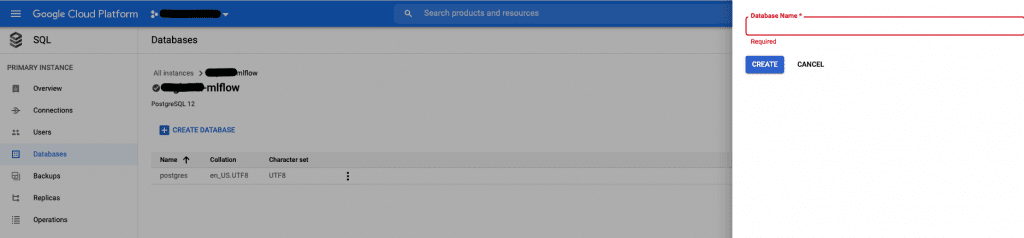
- Now you can create a brand new database in your MLflow artifacts and information
- Notice: you would possibly discover a default database created by the GCP with the identify “Postgres,” however we advocate you create a brand new database with a extra explanatory identify
- Go to the SQL element -> Databases -> Create Database
- Select a reputation in your database and click on Create
- Subsequent, arrange an SSL certificates
- Go to SQL occasion particulars -> Connections -> Click on ‘Enable solely SSL connections’
- Final of all, it’s good to create a brand new person in your database
- Go to SQL occasion particulars -> Customers -> Add Person Account
- Set PostgreSQL authentication, username, and password
- Click on ‘ADD’


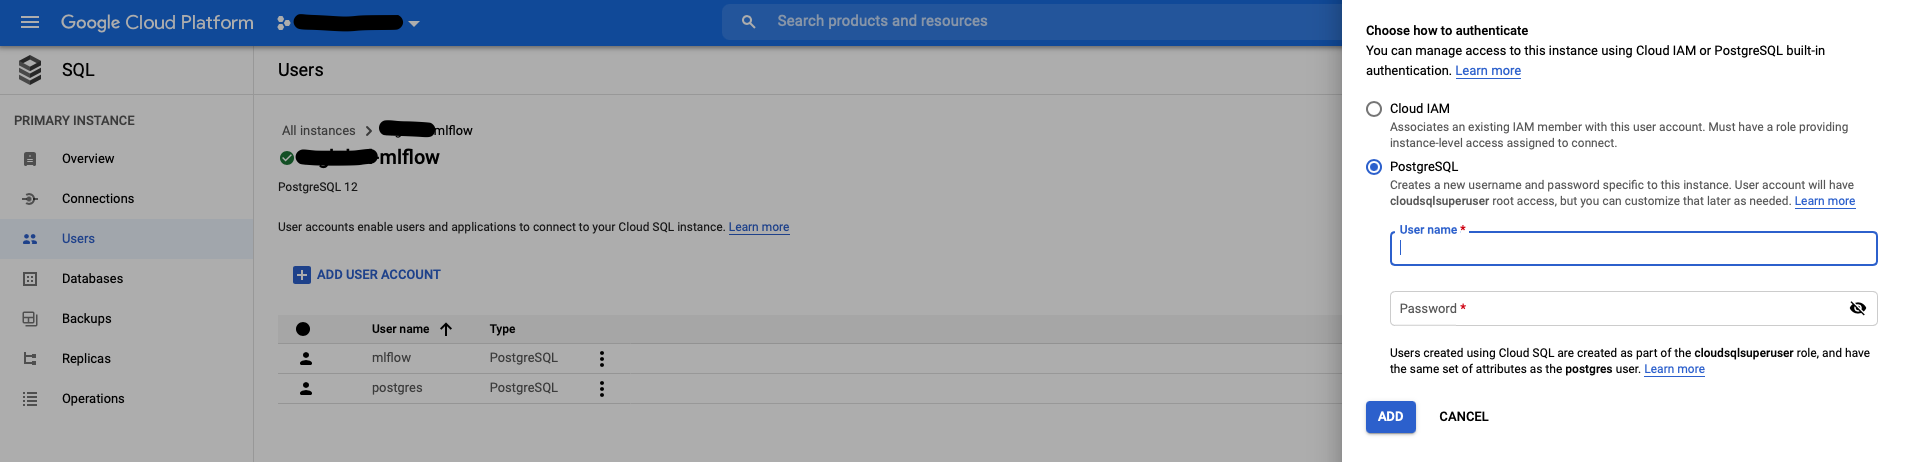
Necessary: this person may have superuser privileges, however you’ll be able to grant and prohibit permissions in a while (there’s loads of documentation on GCP relating to entry roles)
Your database is all set — nice job!
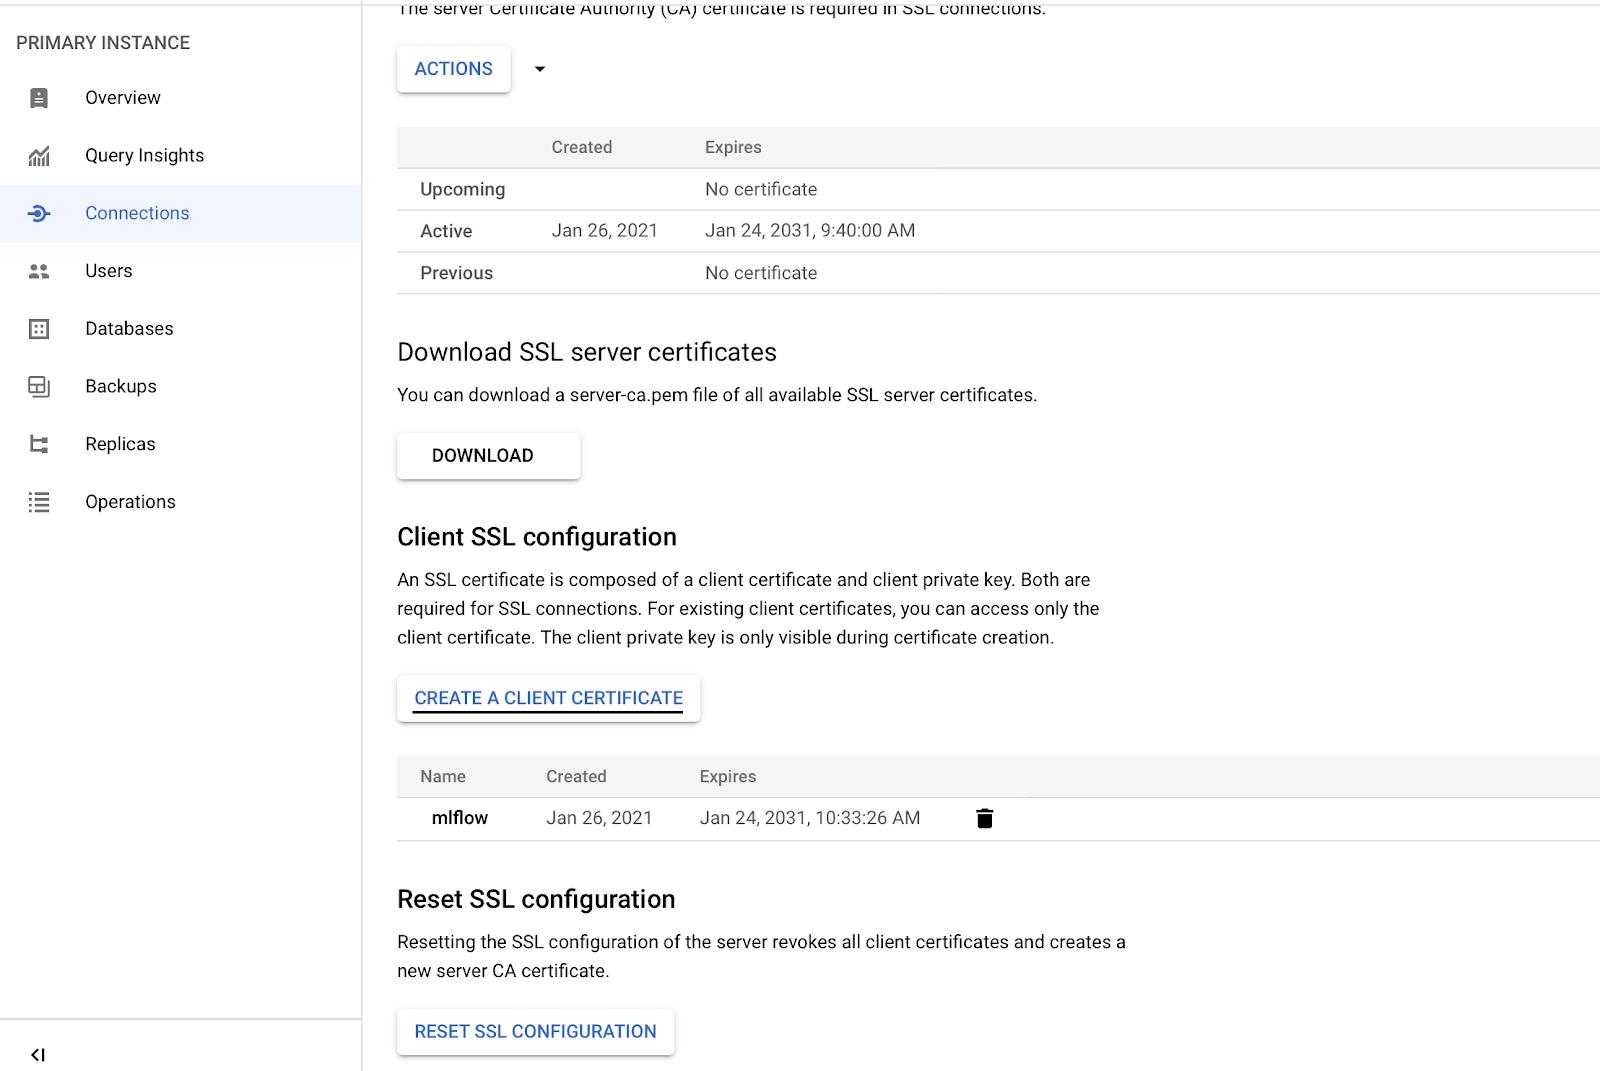
SSL Connection
To permit MLflow to hook up with your SQL occasion, it’s good to arrange an SSL connection. To do that, go to the Connections part of your SQL occasion panel.
Then, comply with the steps under:

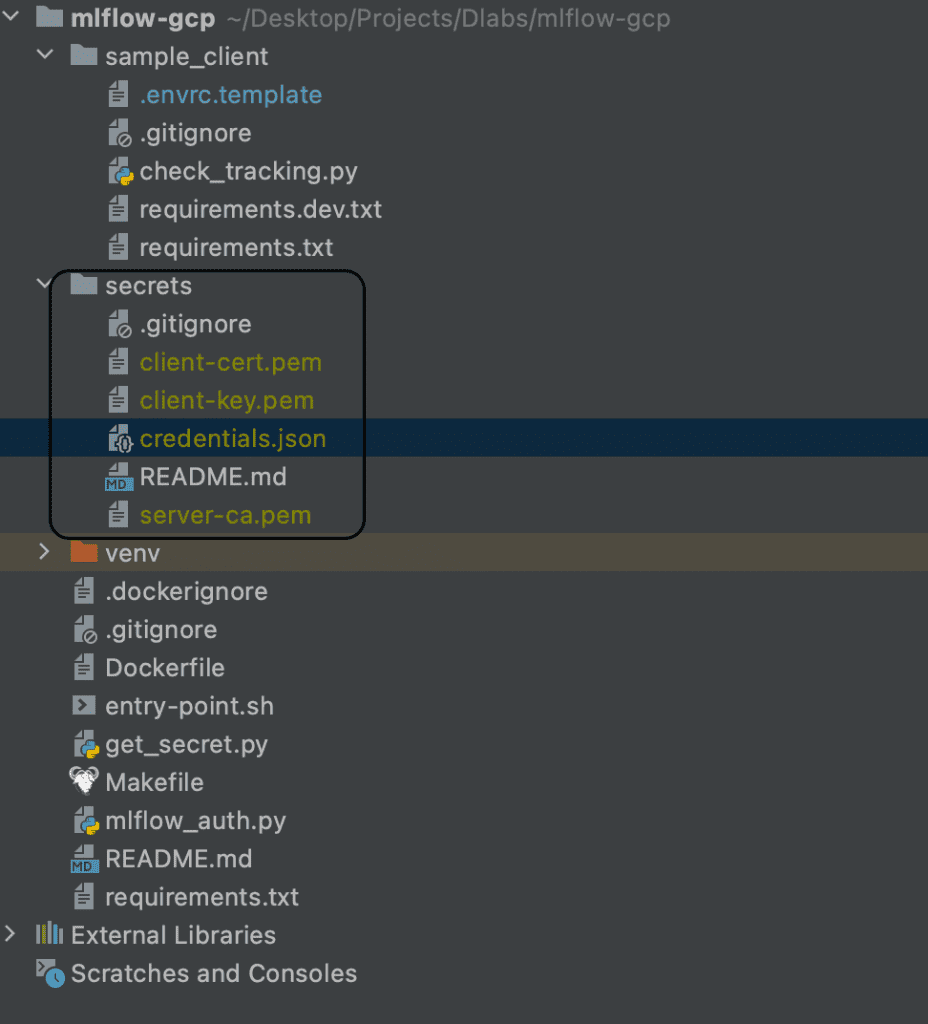
- Click on ‘CREATE A CLIENT CERTIFICATE’ and obtain the recordsdata client-cert.pem, client-key.pem and server-ca.pem

- Now transfer them to the secrets and techniques listing in your native copy of the mlflow-gcp repository
Storage Bucket
To retailer MLflow artifacts, you’ll want a ‘Storage Bucket’. Right here’s the way to set one up:
- Select ‘Storage’ from the left-hand GCP panel
- Click on ‘Create Bucket’
- Set identify and most popular location; you’ll be able to go away the remainder of the parameters as ‘Default’ (if it’s good to modify their settings, there are thorough guidelines that can assist you do this)

- Click on ‘Create’
…and that’s your second element full — you’re on a roll!!
Secret Supervisor
To deal with authentication in MLflow, you’ll want some help, however Google has you coated — you should utilize ‘Secret Supervisor’:
- On the left GCP panel, click on ‘Safety’ -> Choose ‘Secret Supervisor’
- Allow Secret Supervisor
- Create Secret:
- mlflow_artifact_url: that is the tackle of the Storage Bucket the place you’ll retailer MLflow artifacts
- When creating Secret Supervisor, you must set the Secret Worth
- In case you set the key identify as mlflow, then the default secret worth must be gs://mlflow
- Notice: you can even test this in Storage -> Bucket particulars -> Configuration (hyperlink for gsutil)
- mlflow_database_url: SQLAlchemy-format Cloud SQL connection string (over inside GCP interfaces, not via IP), pattern worth postgresql+pg8000://<dbuser>:<dbpass>@/<dbname>?unix_sock=/cloudsql/tc-global-dlabs:europe-west3:mlfow/.s.PGSQL.5432 — the Cloud SQLinstance identify may be copied from Cloud SQL occasion overview web page
- mlflow_tracking_username: the fundamental HTTP auth username for MLflow (your alternative)
- mlflow_tracking_password: your alternative
- mlflow_artifact_url: that is the tackle of the Storage Bucket the place you’ll retailer MLflow artifacts
- Right here’s what you need to now see:


In case you reached this level, nice job — that’s one other element prepared!!!
Container Registry
For this step, you’ll want Docker Engine: discover the set up information here. In case you’re an Ubuntu person, change to any appropriate distribution that matches your wants. You may also use the Docker Desktop app, which incorporates Docker Engine.
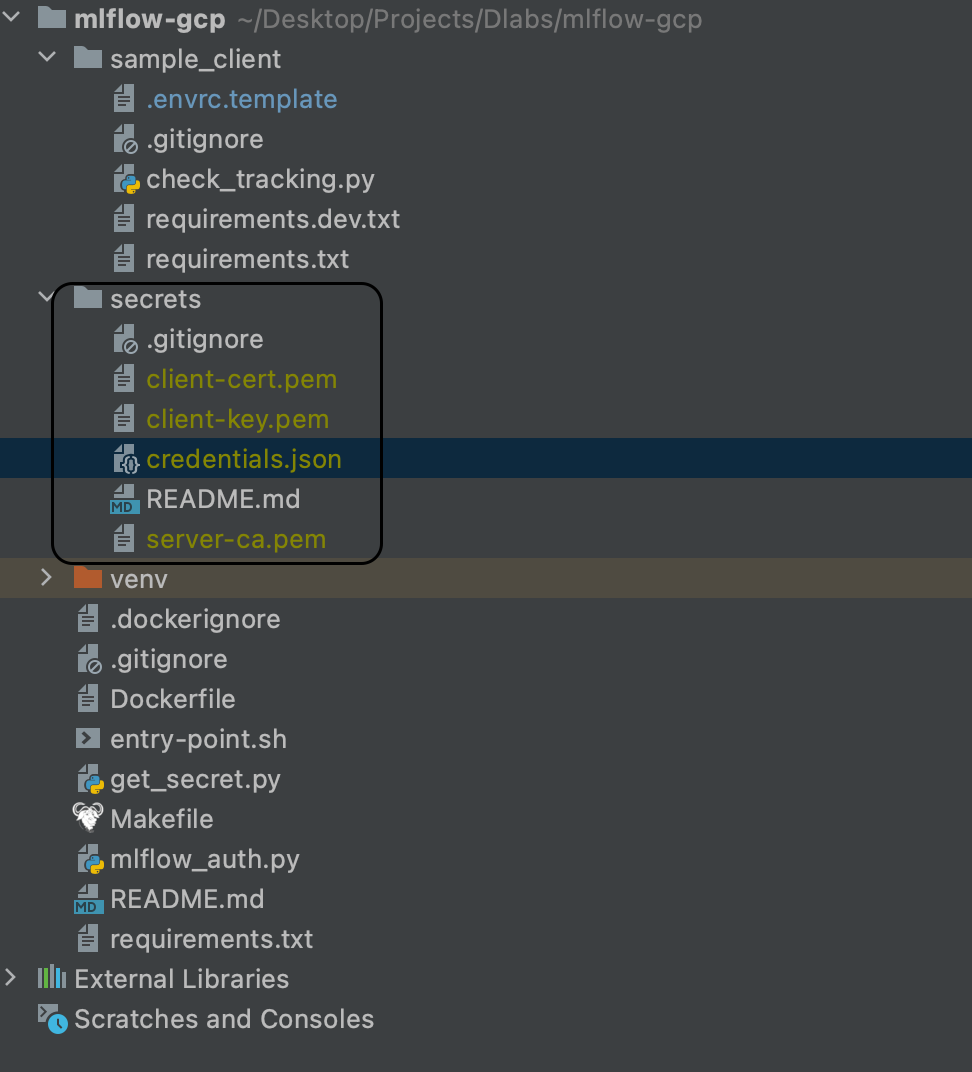
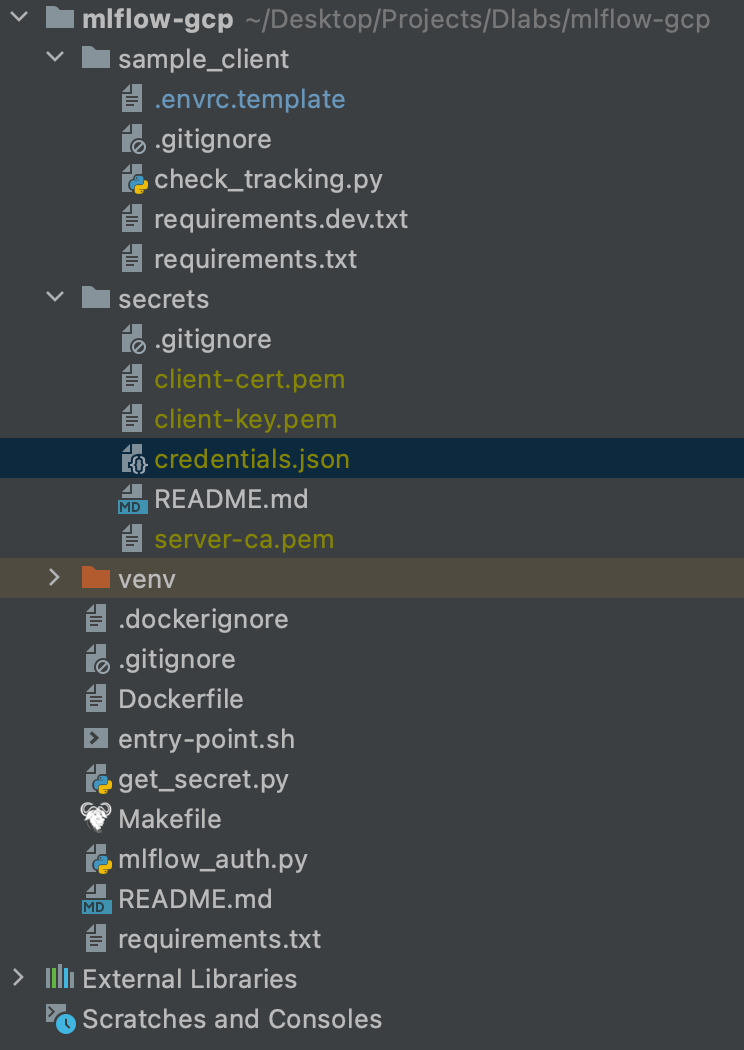
When you’ve put in Docker, you need to push the picture from the linked repository to the Google Cloud Platform Container Registry element.
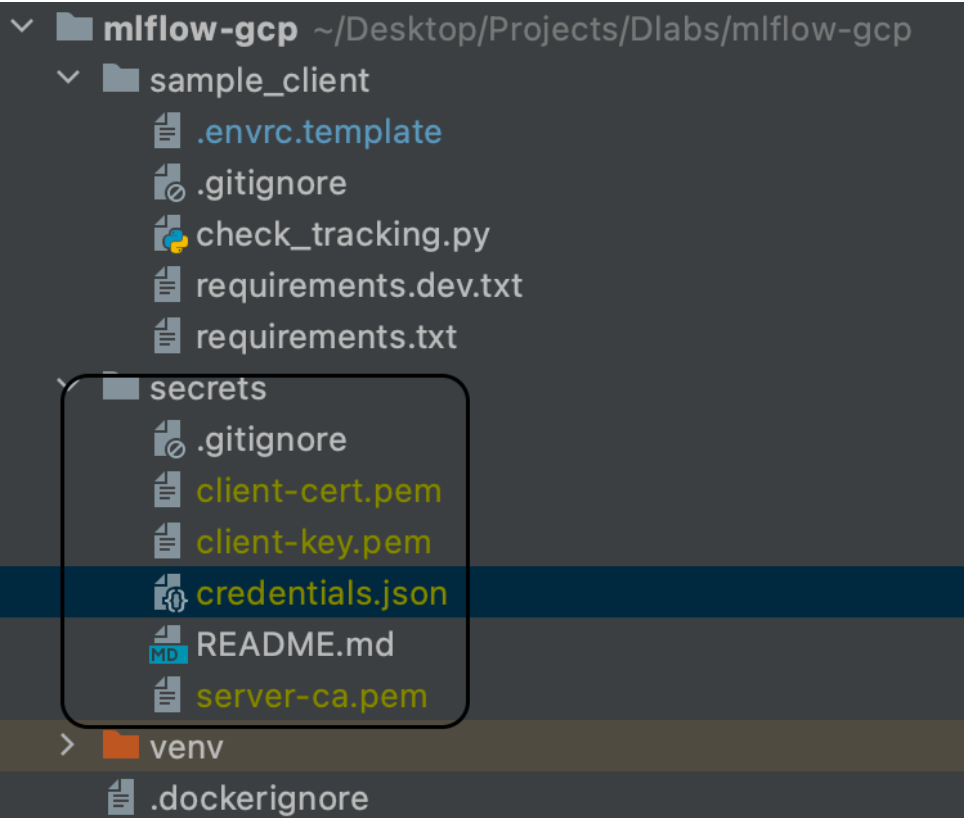
At this level, be sure you have all of the required parts in your repository in order that your picture works correctly.
The next picture exhibits how your repository ought to look:
To push the picture, comply with these steps:
- Run in shell on native machine:
`export GCP_PROJECT=name_of_your_project`
- The place the identify of the undertaking is the undertaking id from GCP (copy it from the URL https://console.cloud.google.com/home/dashboard?organizationId=XXX&project=YYY the place the YYY is the undertaking id)
- Run in shell:
`make docker-auth` - Then run:
`make construct && make tag && make push` - If profitable, you need to see the next:

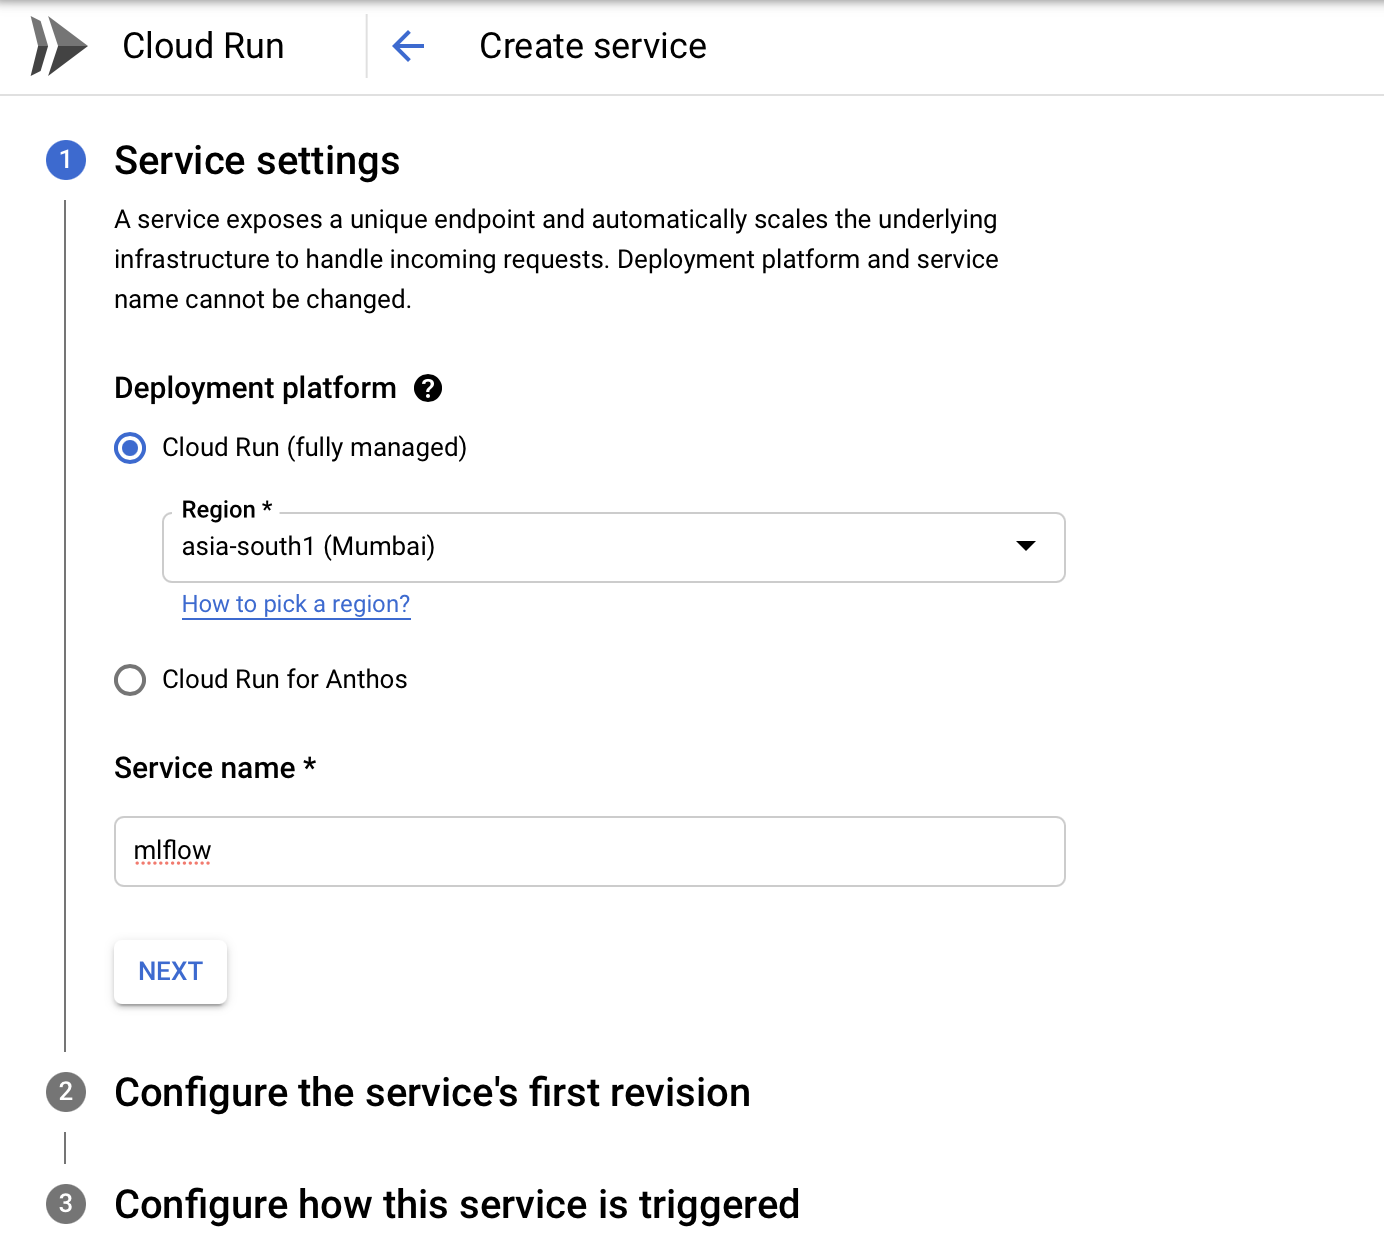
Cloud Run
The final job to finish earlier than you’ll be able to entry MLFlow is to run the docker picture in GCP. To try this, use the Cloud Run element.
- Create a brand new ‘Cloud Run’ deployment utilizing the picture you simply pushed to the Container Registry


- Choose “Enable unauthenticated invocations” to allow incoming net visitors (MLflow will probably be protected by HTTP fundamental auth at a later step)
- Give the machine 1GB of RAM (use the service account you created earlier; you’ll be able to lower the utmost variety of situations)
- Use the beforehand created service account in order that your Cloud Run can retrieve credentials
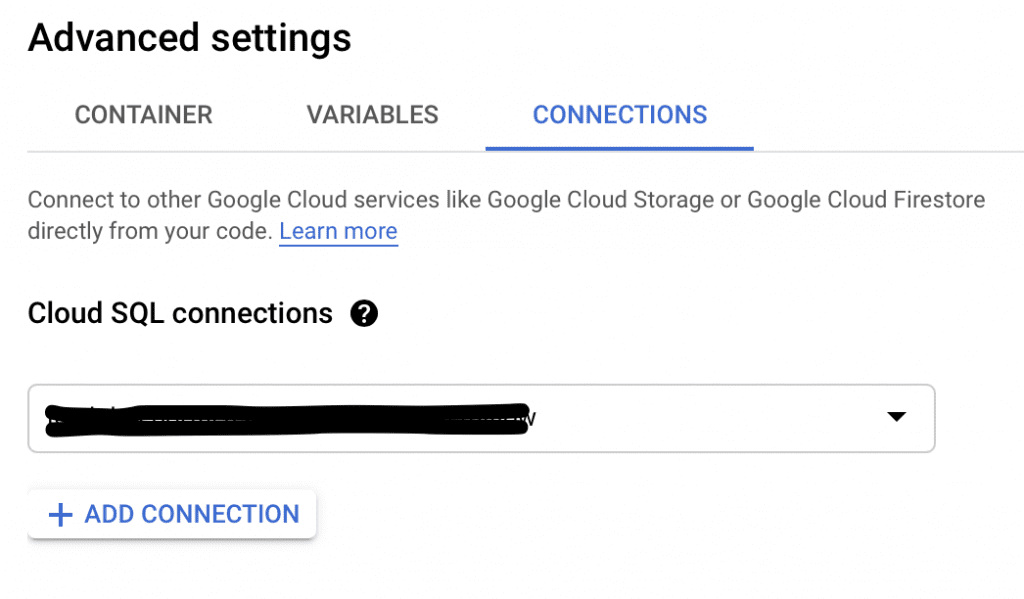
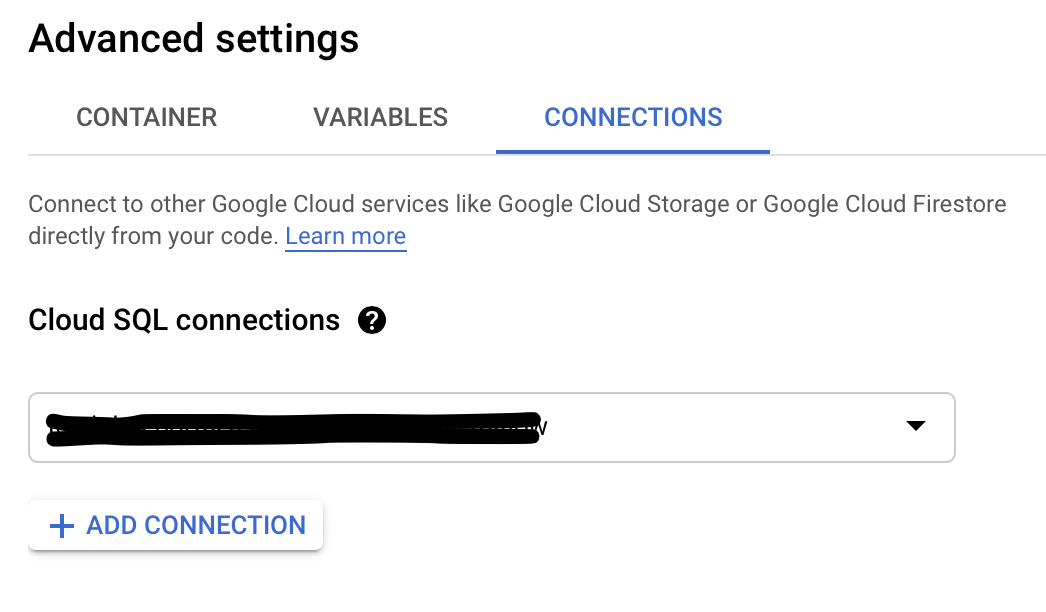
- Within the ‘Connections’ tab, add a connection to your Cloud SQL occasion
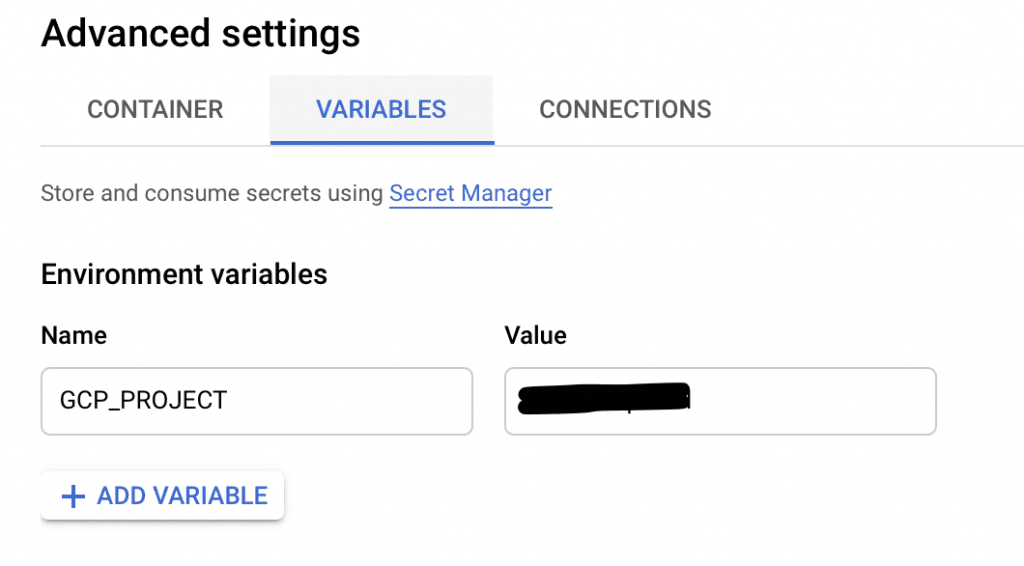
- Within the Variables tab, add the next variable:
- GCP_PROJECT — the identify of your GCP undertaking
- This lets the containerized app know from the place to retrieve the secrets and techniques
- With all the mandatory fields full, hit ‘CREATE’


After some time, the deployment ought to full.
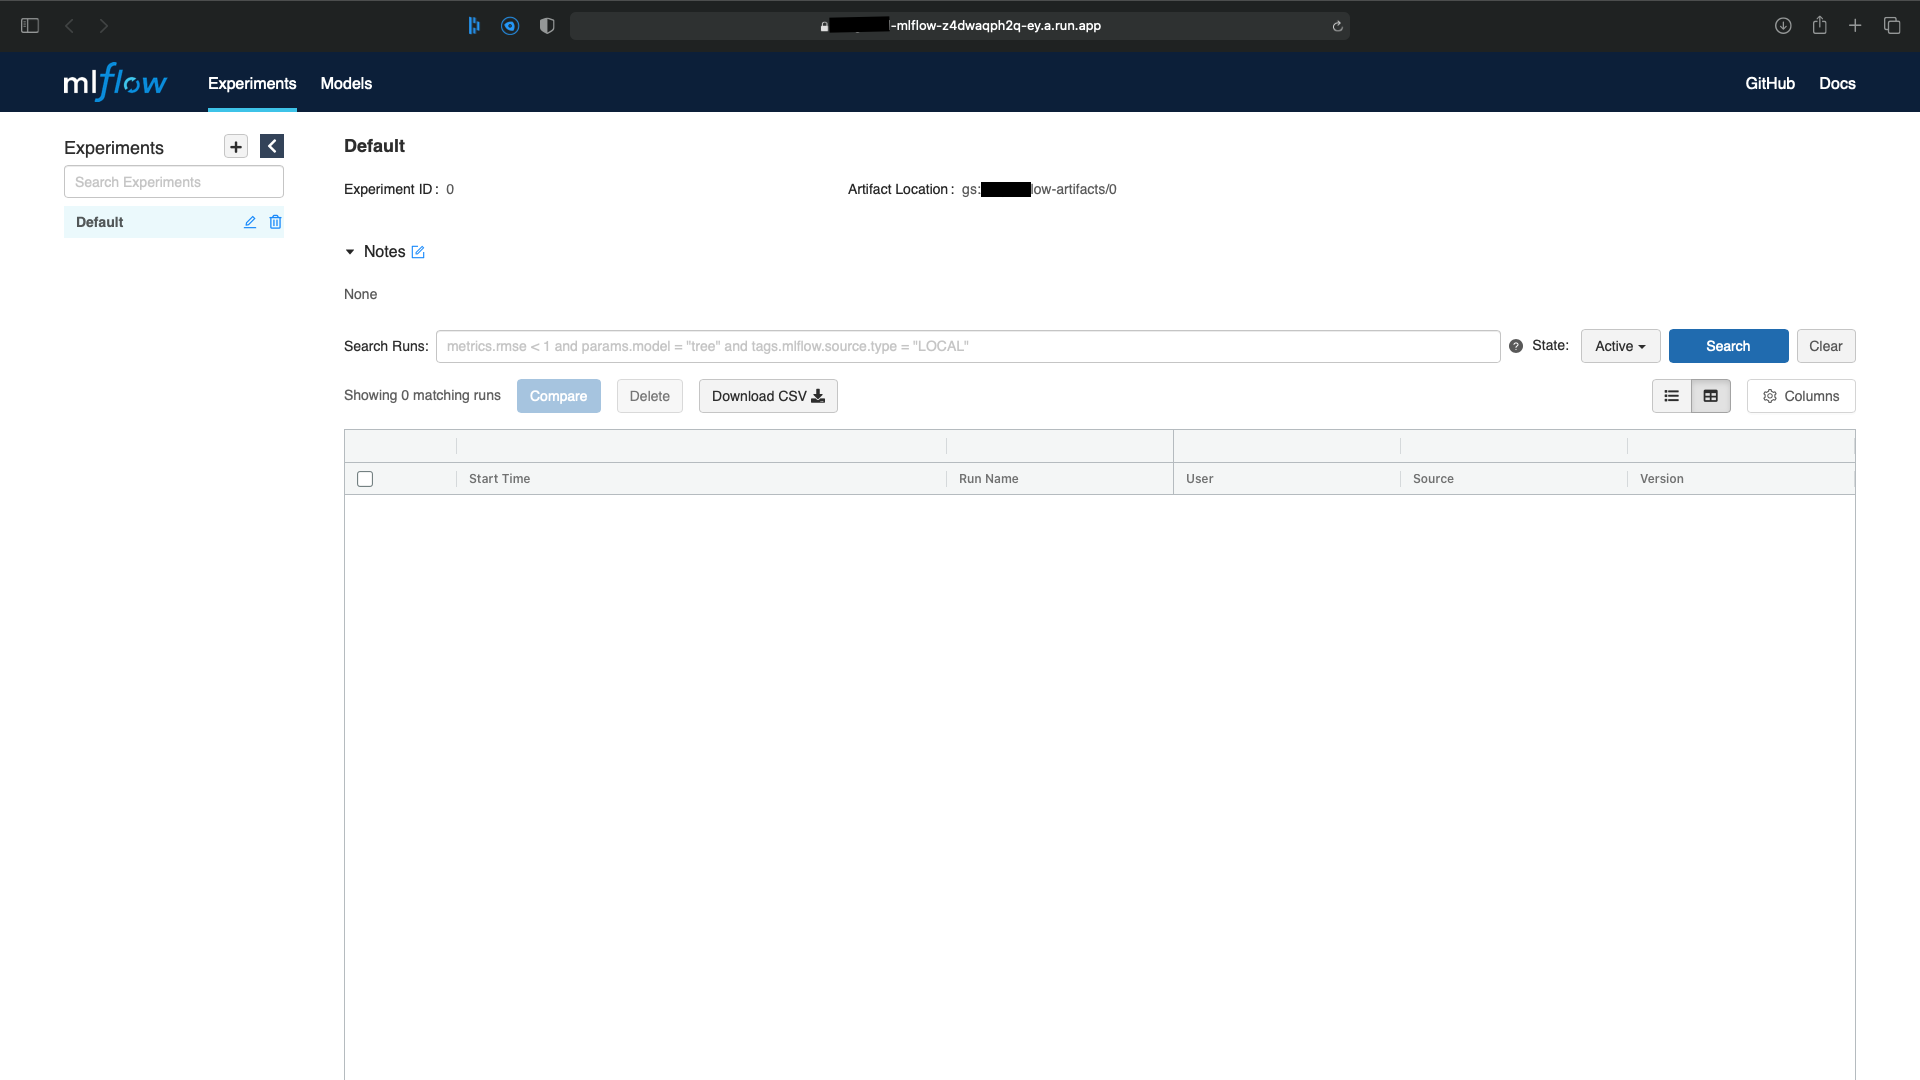
Now, you should utilize MLflow to run experiments! To do that, comply with the URL displayed on the entrance web page of your ‘Cloud Run’ element, as proven within the picture under.

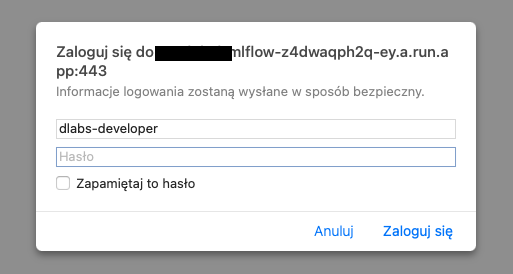
MLflow login
Now you need to see an entry web page the place you must specify your credentials. These are the identical as these saved in Secrets and techniques – mlflow_tracking_username and mlflow_tracking_password.
Add them, click on ‘Login’ — and also you’re set!
Your absolutely useful MLflow awaits.
Utilization Take a look at
At this level, you need to have entry to the distant MLflow GUI as described within the earlier paragraph. Now, it’s time to learn to add some metrics (which could be very easy!).
First, you need to set the atmosphere variables in order that your native machine is aware of the way to join with the distant MLflow app. To try this, see the ‘Utilization’ part of the README.md file within the repository.
Now, it’s time to check. There are two examples within the linked repository contained in the sample_client folder:
- mlflow_example.ipynb – easy instance exhibiting the way to use MLflow in Jupyter Notebooks with feedback (really useful)
- check_tracking.py – easy instance on the way to use MLflow contained in the Python code: as you’ll be able to, see MLflow helps context supervisor, and I encourage you to make use of it at any time when attainable
Each of them ought to end in a brand new experiment within the distant MLflow. If not, fastidiously test you’ve coated all the sooner steps.
What’s Subsequent?
MLflow is a robust platform.
Now you’ve set it up, it’s time to discover your complete Machine Studying lifecycle. What’s the easiest way to try this? Right here’s an concept…
Why not construct your subsequent mannequin utilizing this useful gizmo? Then you definately’ll have all of your charts, studying curves, ROC, metrics, and extra saved in a single secure place, leaving you free to entry them everytime you like.
Crucially, you’ll additionally be capable of share every little thing together with your teammates in order that irrespective of who’s engaged on the mannequin, you’ll be capable of progress it in tandem. What’s extra, a versioning system is ideal for experimentation, with iterations saved with the date and writer, so you’ll be able to evaluate outcomes as you progress ahead.
Final however not least, you’ll be able to add and retailer your fashions within the Fashions part of MLflow. The comfort of all of it will undoubtedly make your life simpler from day one.
Now over to you: get your subsequent concept rolling — and good luck!
Trying to introduce machine studying to your organization? Arrange a free consultation with DLabs.AI for steering on the very best path ahead.
[ad_2]
Source link
